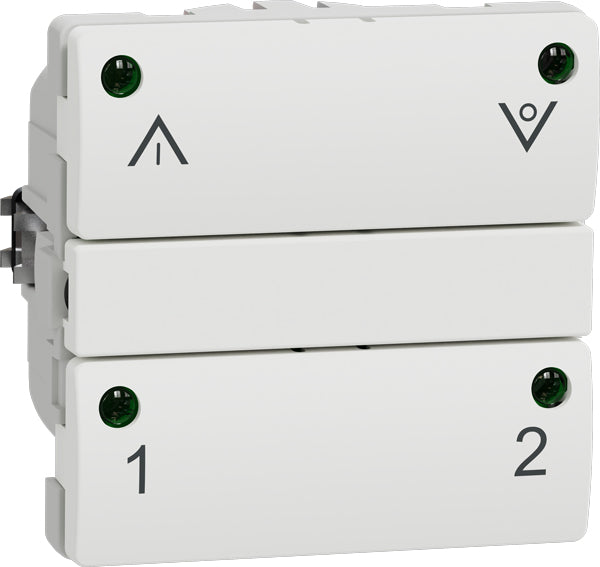
Schneider Electric/Lauritz Knudsen recently introduced a new dimmer, 545 D 6104:
which unfortunately replaces, rather than complements, the 545 D 6102:
After installing a new lamp, I wanted to add a dimmer for controlling a Philips Master DimTone bulb. I already have quite a few of the IHC-style dimmers/relays, but since the dimmer is already out of stock or insanely expensive, I decided to accept the new reality and give the new dimmer a shot.
I had some reservations, because I already knew that the new dimmer is less advanced than the old one: It has only two buttons, whereas the old one had four. Additionally, the old one one also had four LED’s.
Installation
After receiving it, I was pretty eager to get it installed. Before that, however, I gave it a quick test to pair it and see how compatible it would be with my bulb when paired with Philips Hue (rather than deCONZ), particularly whether I would need to set a minimum dimming level, which is not possible with Hue.
Luckily, the DimTone bulb played along very nicely, with 1% dimming being almost off and no flickering at all. Controlling if from Philips Hue is very much compatible with the old dimmer, i.e., it’s still not possible to turn it off.
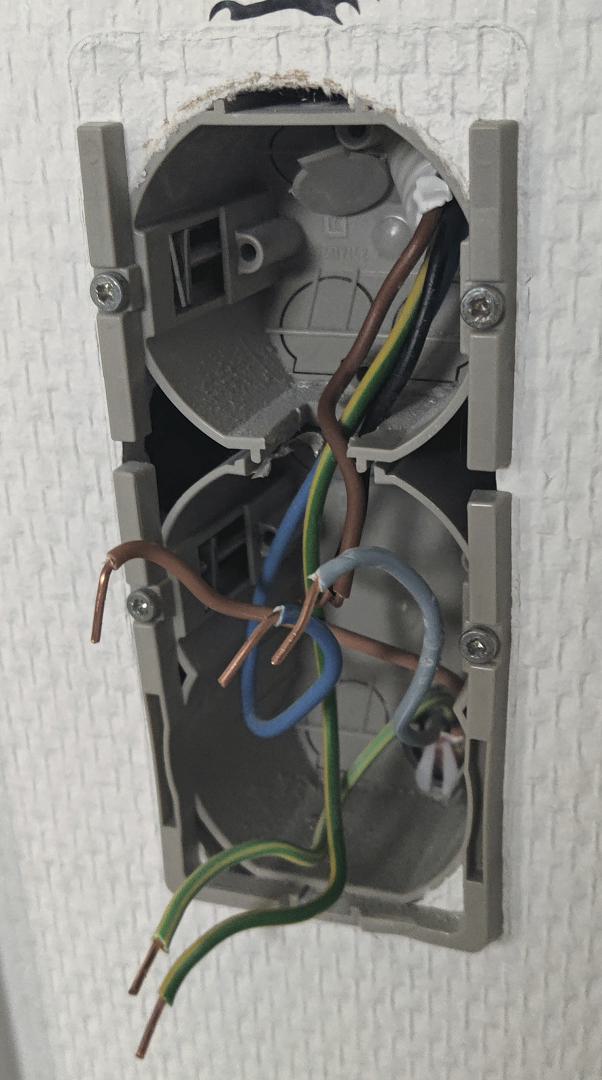
I went on to install it between a 545 D 6102 and an electrical outlet. This proved to be very difficult and frustrating, so let’s look at why:
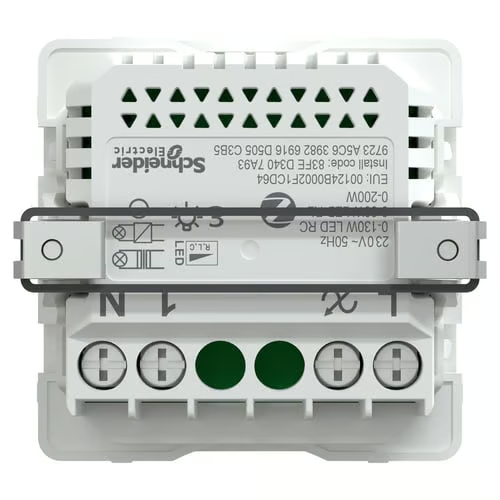
First of all, it’s very big. According to the datasheet, it’s 41 mm deep. I wasn’t able to find directly comparable specifications for the 6102, but it’s clearly not as deep or massive.
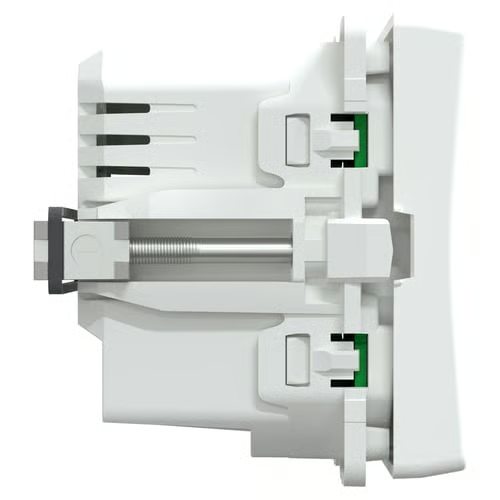
Another problem is the wiring terminals are at the bottom. This is particularly annoying when the wires are coming from the top of the wall box and the dimmer is installed in the bottom position. This combination made it impossible for me to install as bottom module in an old 2.0-module wall box. It simply doesn’t fit, and when trying (hard), I also had to extend one of the wires with a WAGO connector (at the top is the old 6102, and below it the new 6104):
Another major step backward, in my opinion, is the use of screw terminals. They require longer wires than actually necessary in order to position the module where there is enough space for a screwdriver. Also, when loop-through wiring is needed, you have to fit two solid-core wires into the same terminal.
This is much harder to work with than the superior push-in terminals where each wire has its own terminal and where wires can easily be pushed in while all modules are still close to the wall.
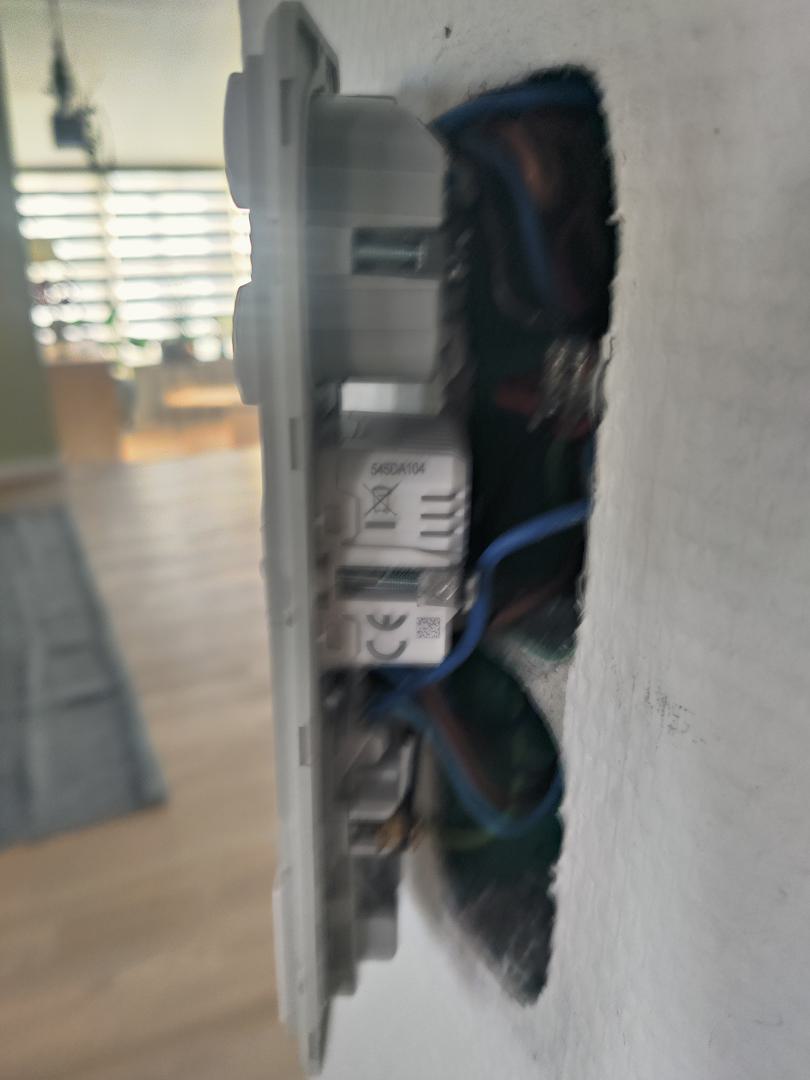
Ultimately, I had to abandon the project in the pictures above and find another purpose for the dimmer. I finally managed to install it in an old 1.0-module drywall box, but it required a lot of rewiring and an extreme amount of pressure to fully get it into position because of its sheer size, especially at the bottom.
And, to be honest, I didn’t actually manage to get it fully into position. I tried, but it was impossible:
Not much bottom spaceAlmost thereSlightly skewed
Functionality
After finally getting it installed, I gave it a few more tests.
One function I didn’t expect is a red LED right in the middle behind the switch cover. When dimmed, this LED turns on. I noticed it when the room was dark and the dimmer was set to to 1%, leaving barely any light in the room.
It feels a bit awkward having a red LED behind a white switch cover, and its functionality is hardcoded, but nevertheless, it’s there – noticed and now mentioned.
Dimming itself works nicely, but it’s a bit too fast when holding down the switch, making it practially impossible to hit 1% or even 5% manually. That has to be done through software.
And unlike the 6102, it doesn’t have any memory function or physical switches for saving favorite dimming levels.
Power consumption
I measured the power consumption with a Spar-O-Meter over 14 hours and 7 minutes before moving on with the installation. During that period, it consumed 0.003 kWh, which corresponds to a standby power consumption of approximately 0.3 W.
That’s slightly better than the 6102, which consumed 0.009 kWh over 24 hours, i.e. approximately 0.4 W in standby.
Conclusion
Overall, I’m quite disappointed with this product. I don’t think it lives up to LK’s own high historical standards.
It’s “cheap” (~ 500 kr.) compared to the older 6102, but it certainly also feels cheap.
Today I finally received my Pow-K+ HAN port reader which I ordered before Christmas as a gift to myself. Also before Christmas, I prepared for this project by sending an e-mail to N1 (my power grid company) requesting the needed encryption keys. Shortly after, I received my GPK 60 and GPK 61 keys and information that they had activated the HAN port on my power meter.
The waiting time was hard, but worth it. I have been very excited about this product, and now I need to share why.
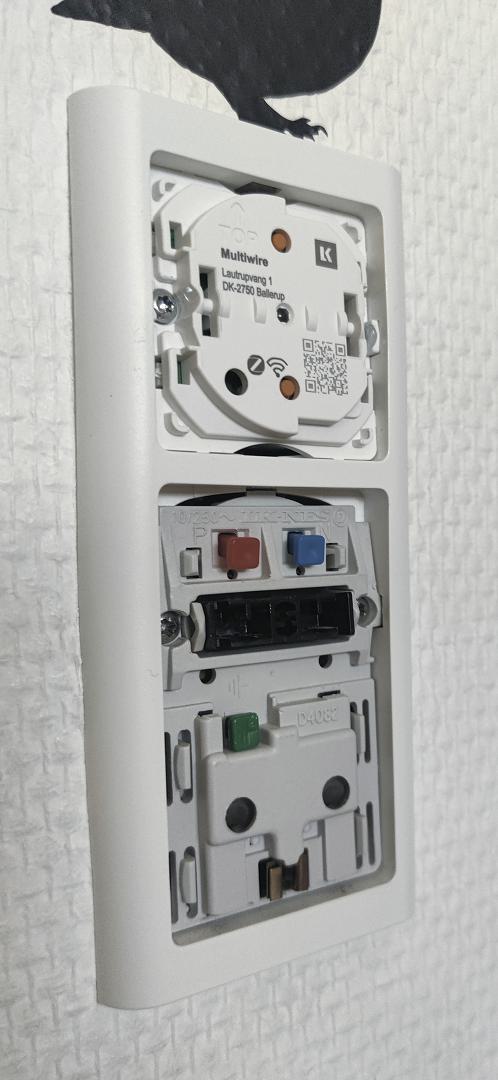
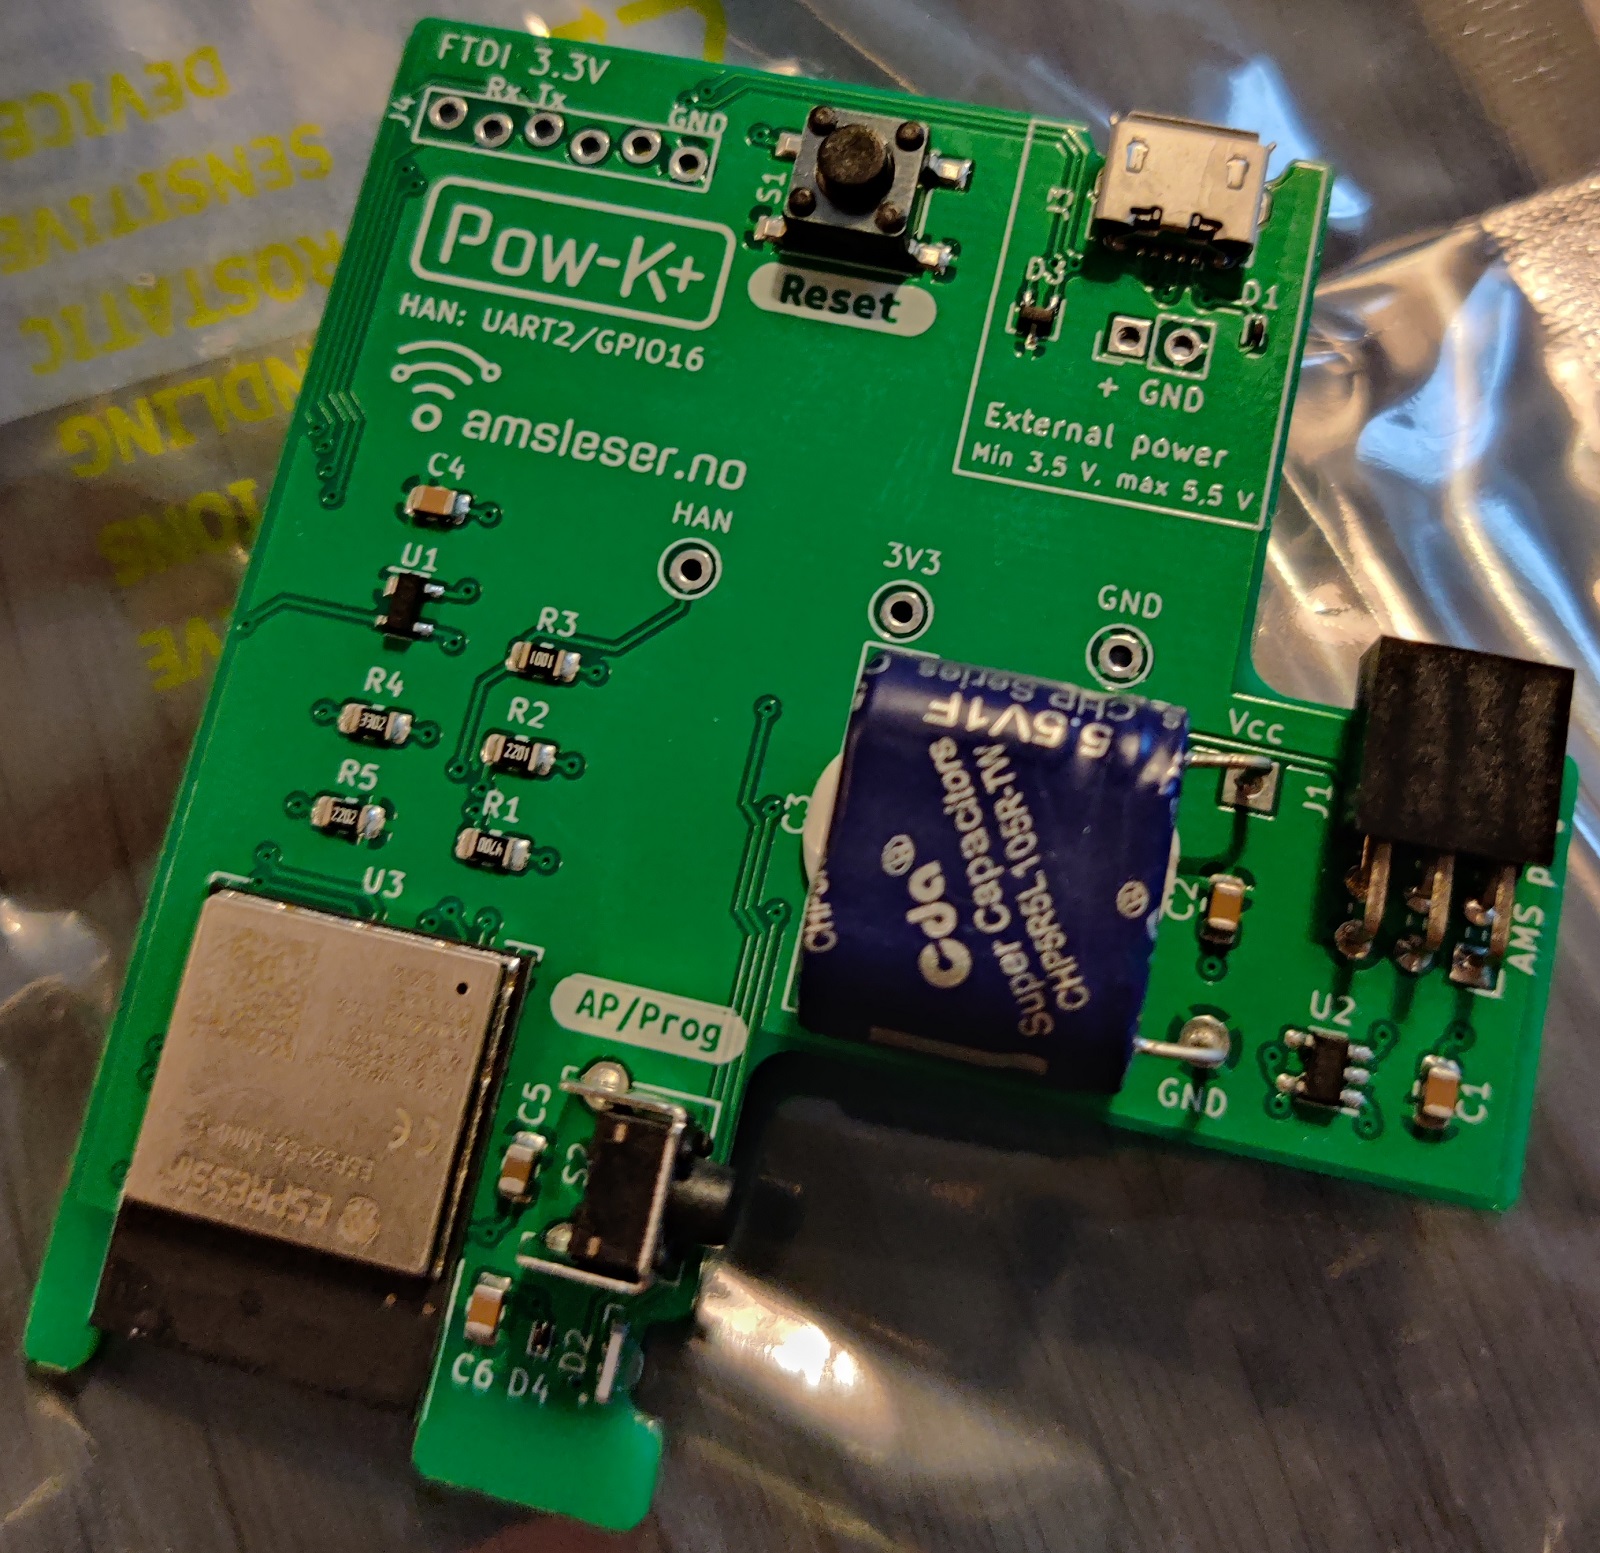
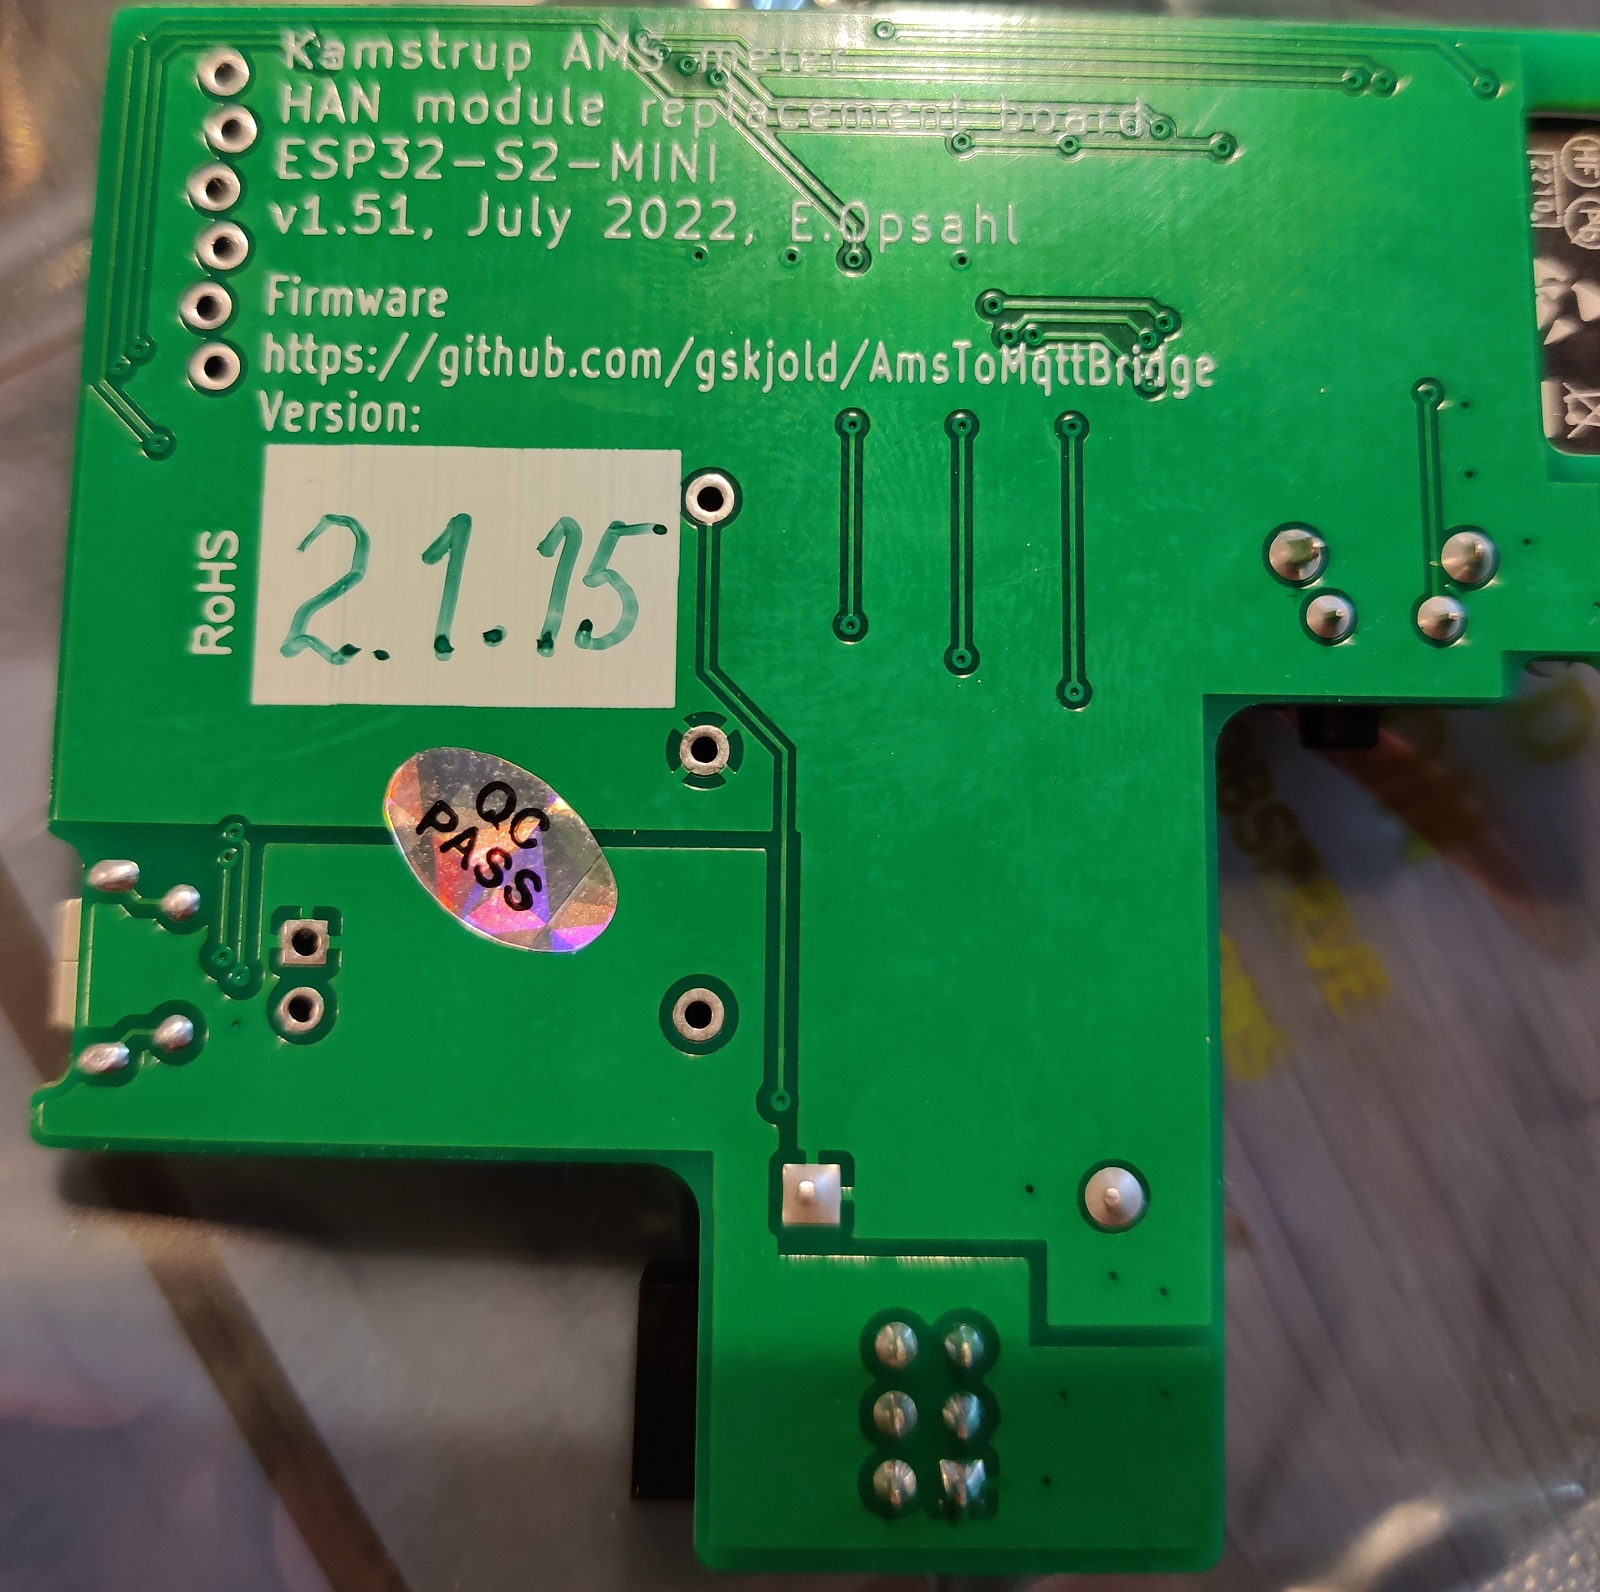
Inside the envelope I found my board:
FrontBack
I immediately realized that I must have made a mistake when I placed my order, since I didn’t have anything to hold or cover this board. Luckily, the STL file for the 3D model is freely available. So I asked a friend for help, who happens to be quite proficient and well-equipped when it comes to 3D printing. So a few hours later I could pick up a nice holder for the board.
Installation
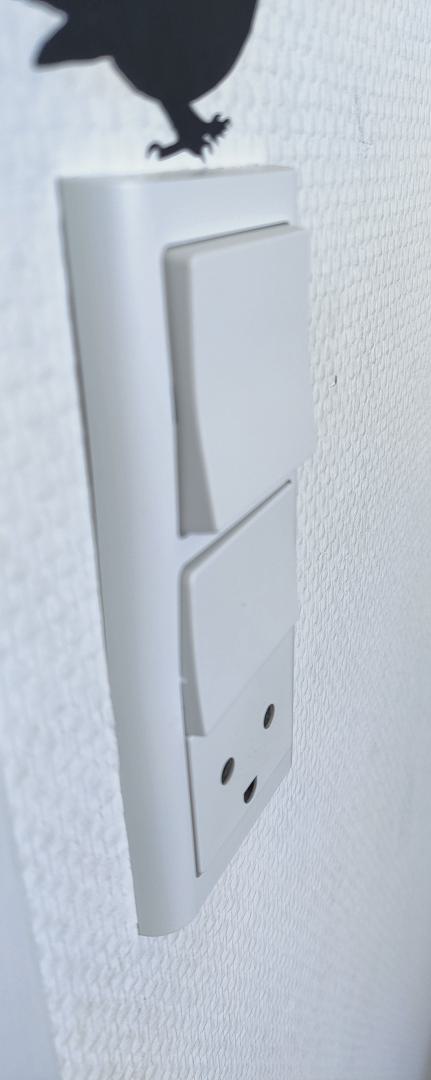
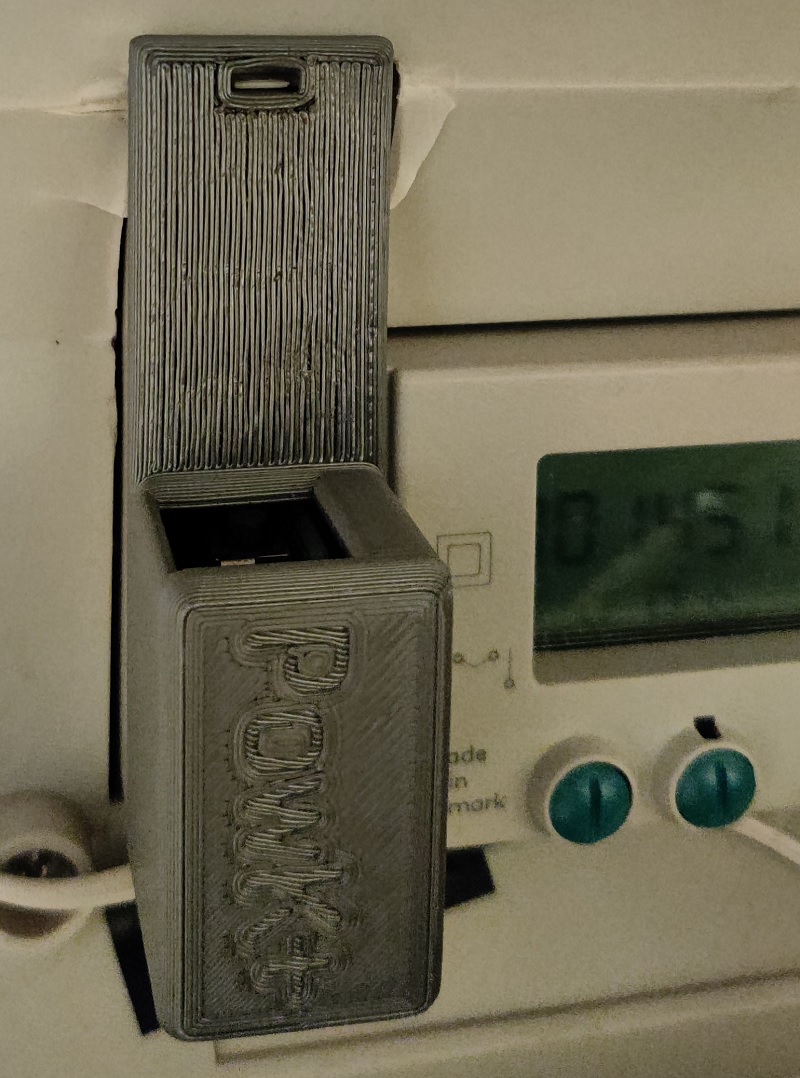
In the meantime I had also received confirmation that this board doesn’t need power from an external source, so can simply be plugged in. Like this (the cable on the picture is not related to this module):
HAN module installed
Configuration
And now the impressive part – the configuration. Through the big hole seen on the picture a small button is accessible. After holding it for a few seconds, the module created its own access point, and I could connect to it and make the initial Wi-Fi configuration from my phone (remembering 192.168.4.1 which I had read in the documentation earlier). So I configured my IoT SSID and nothing more, since I planned to assign a static IP from my DHCP server later when knowing its MAC address.
After restarting from this initial configuration, it connected to my Wi-Fi and I could now go to my PC and finish the configuration (and also restart it after configuring a fixed IP address on my router). This required only very few steps, like entering the GPK 60 key as “Encryption key” and the GPK 61 key as “Authentication key”. I also had to select parity, which for Denmark is 8N1. Already at this point I was able to see some useful live data on the main webpage. Literally it was fully working and showing data within a few minutes from plugging it in for the first time.
Now it was time to configure MQTT so I could integrate the meter with my home automation and start logging values in my database. So I went to the MQTT configuration page and entered the hostname of my MQTT broker, a publish topic (I chose “omnimeter”) and “Raw values (minimal)” as payload. That’s it. On my openHAB server, which is also hosting mosquitto, I could then have a peek at the published data:
mosquitto_sub -h localhost -t omnipower/# -d
So with a few more minutes of configuration in openHAB, I started to receive the data I have been so eager to get access to. Like this – from log perspective:
2022-12-29 22:59:52.667 [INFO ] [openhab.event.ItemStateChangedEvent ] - Item 'Omnipower_RSSI' changed from -61 dBm to -62 dBm
2022-12-29 23:00:02.716 [INFO ] [openhab.event.ItemStateChangedEvent ] - Item 'Omnipower_Phase3_Voltage' changed from 238 V to 237 V
2022-12-29 23:00:02.730 [INFO ] [openhab.event.ItemStateChangedEvent ] - Item 'Omnipower_Active' changed from 540 W to 563 W
2022-12-29 23:00:07.901 [INFO ] [openhab.event.ItemStateChangedEvent ] - Item 'Omnipower_Accumulated' changed from 14510.99 kWh to 14511.57 kWh
2022-12-29 23:00:07.928 [INFO ] [openhab.event.ItemStateChangedEvent ] - Item 'Omnipower_Active' changed from 563 W to 499 W
2022-12-29 23:00:14.096 [INFO ] [openhab.event.ItemStateChangedEvent ] - Item 'Omnipower_Active' changed from 499 W to 569 W
2022-12-29 23:00:22.610 [INFO ] [openhab.event.ItemStateChangedEvent ] - Item 'Omnipower_Active' changed from 569 W to 520 W
For now, no graphs, just integration. And a sitemap as seen from the openHAB Android app:
Sitemap
Conclusion
I’m very impressed by this product because it just works, and without any issues when installing and configuring it. Meter configuration, Wi-Fi configuration and even MQTT just worked without any hassle or problems. Thank you Egil Opsahl and Gunnar Skjold for making this possible, and I can only give my warm recommendation of this product.
Oh, I forgot to mention that Pow-K+ will receive data every 10 seconds and can be purchased for approximately a third of the price of a SmartMe HAN module which has a cloud dependency (basically making it an inferior product). And it’s Open Source!
Take a GitHub issue comment. Add some stubbornness. And months later be ready to publish a 28 page document. I didn’t see that coming. But here we are. Please enjoy, in case you are interested in integrating with the Hunter Douglas PowerView Hub, and find the original document PowerView-Hub-REST-API-v2.pdf lacking in terms of what you can do with the PowerView app vs. your options after reading that document. A few examples for quick inspiration:
Enable/disable automations.
Create scene groups, which can no longer be created from the app. After creating them by using the API, they can still be maintained within the app.
Use your repeater LED’s with your motion sensor to create night light.
Or maybe use it to catch up with openHAB in the Home Assistant integration. 🙂
Bothered by mice living in our attic, we have set up simple mousetraps and caught multiple mice every winter. This has spawned two problems based on mousetraps not being checked systematically or frequently:
In some cases a mouse has been caught and left for weeks or even months unnoticed. This is a quite undesired discovery when finally checking.
In other cases a mouse has successfully eaten the bait without having been caught. This has (also) left the mousetrap out of function for longer periods.
To accommodate both problems and optimize the “mousetrap operational uptime” I wanted/needed a connected mousetrap. I researched online, but was not able to find any attractive solutions. After complaining about this at a Christmas party, a friend of mine, Thomas Jørgensen, came to the rescue with a custom-made hardware solution.
Hardware and configuration
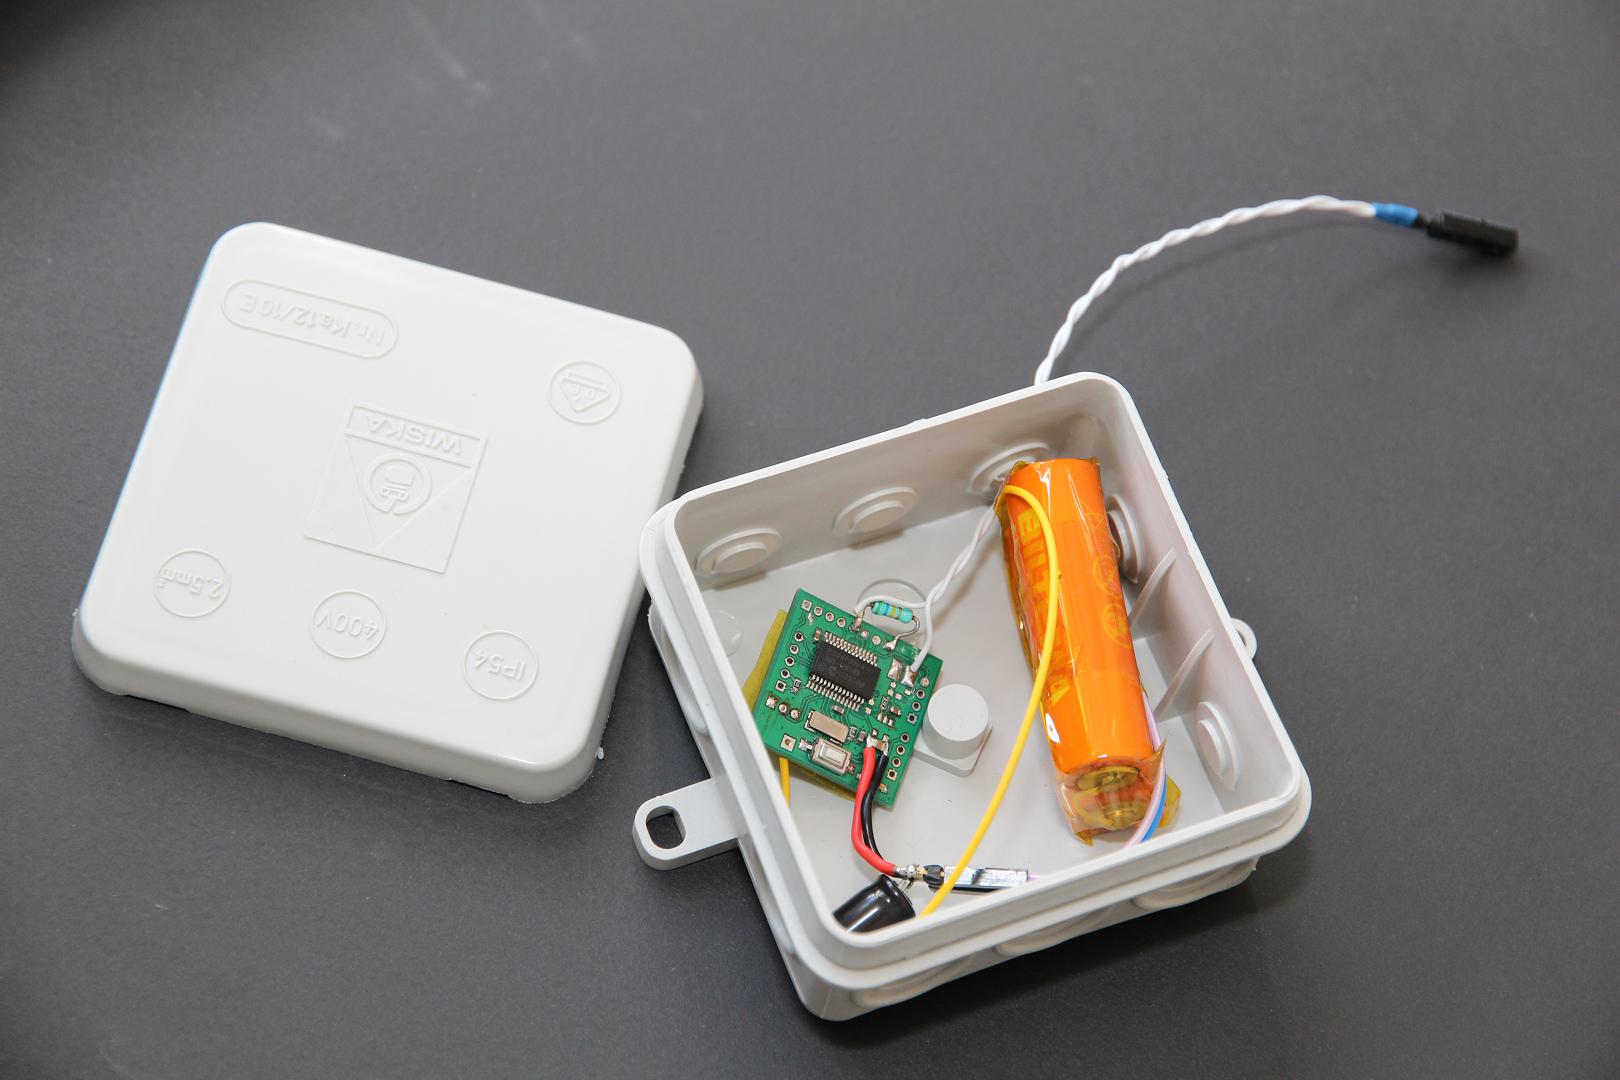
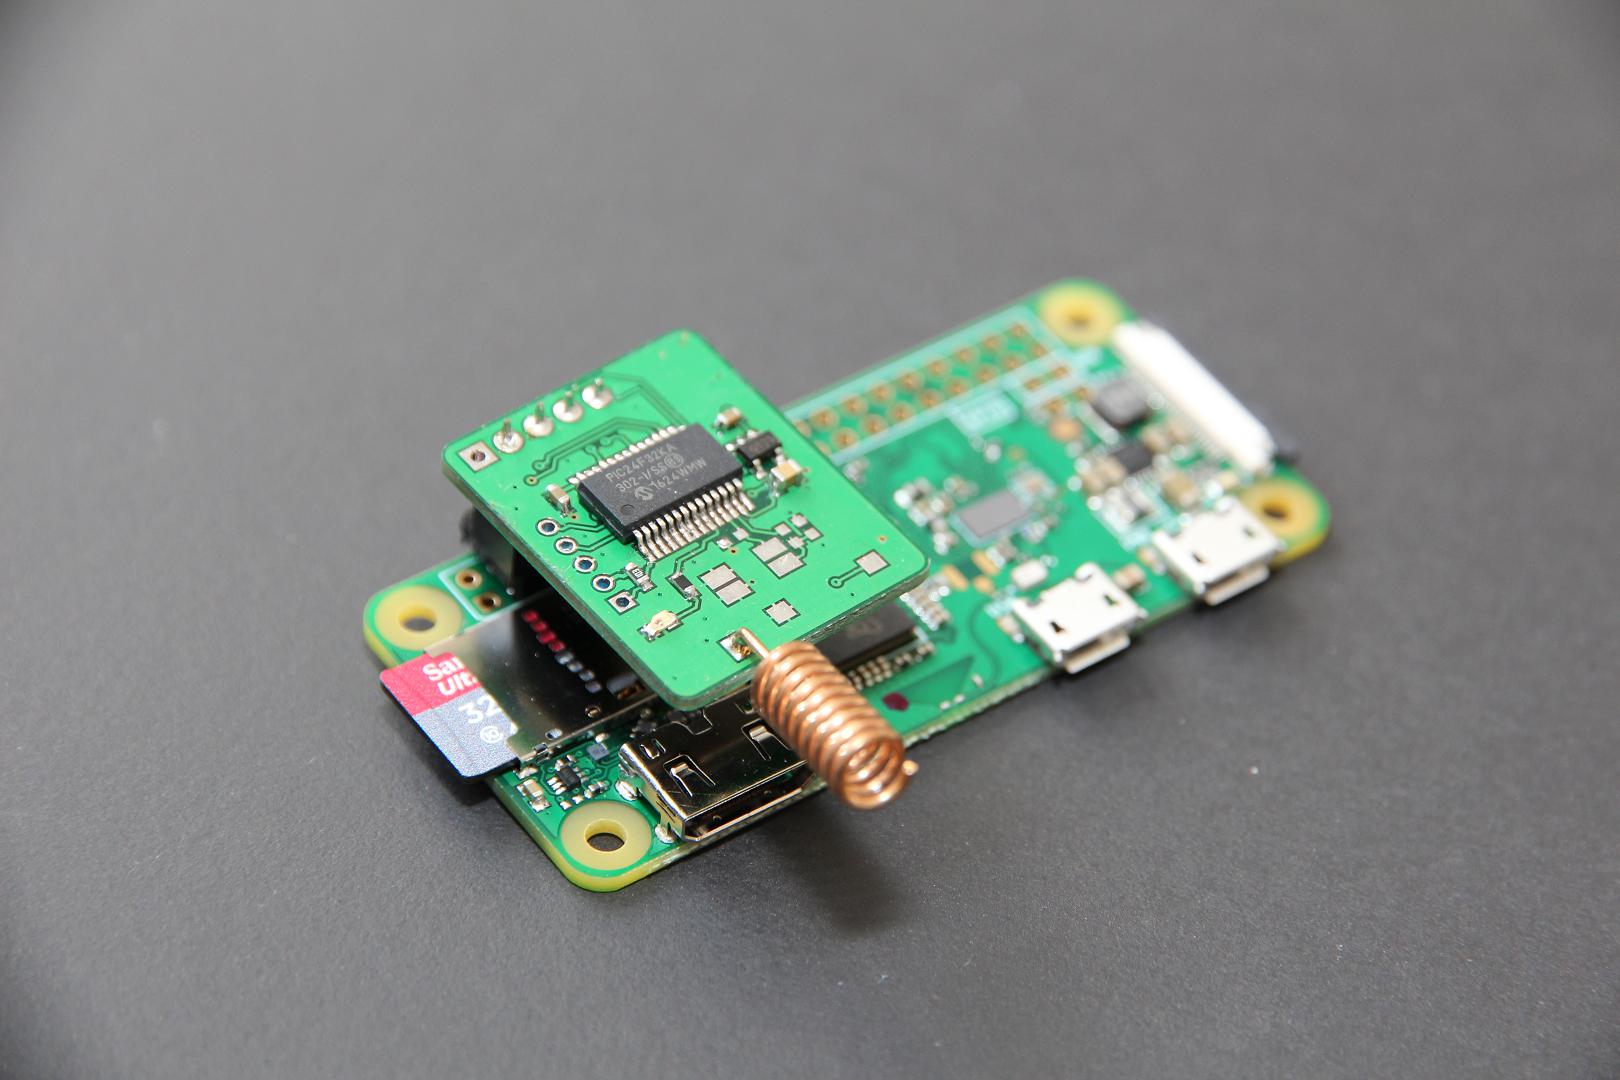
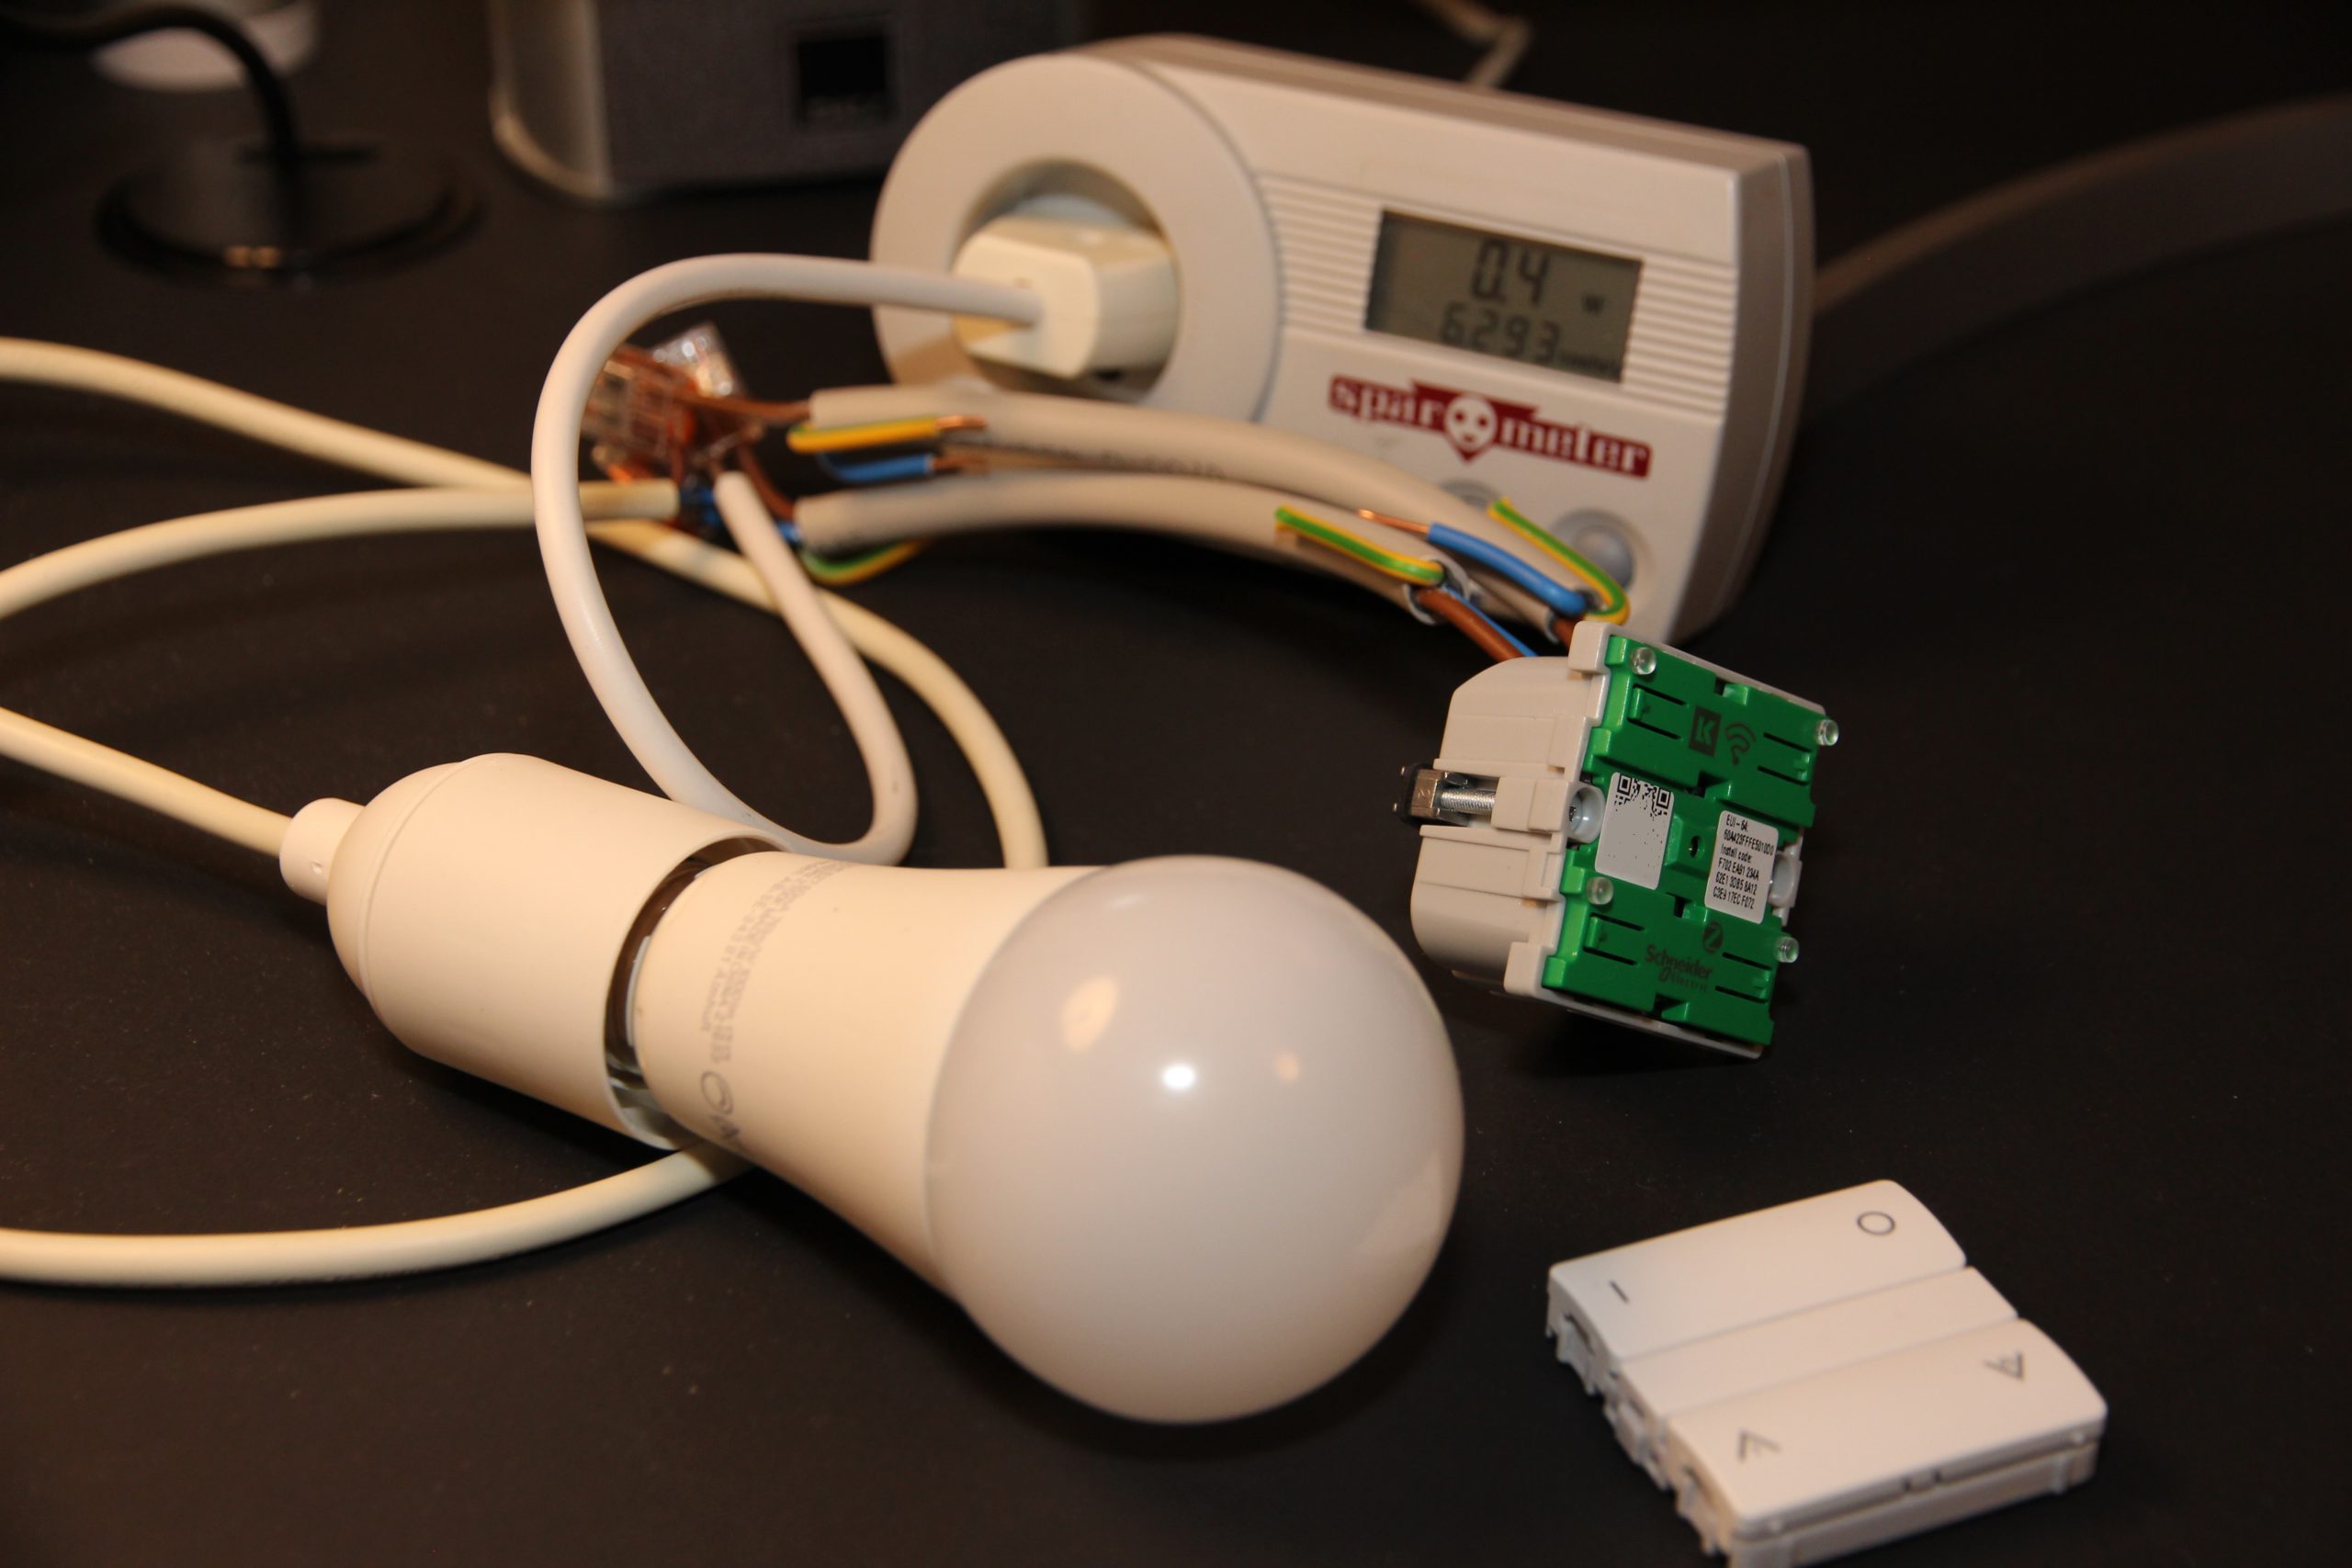
It is based on a microcontroller connected to a HAT on a Raspberry Pi Zero WH which acts as a gateway for this custom long-range RF communication:
The sensor will register any movement. So I just let it touch my old-fashioned mousetrap, and when the trap is moving, the sensor will be triggered and send a small packet to the Raspberry Pi Zero WH.
The Pi will listen to serial communication with a small Python script and receive a small JSON payload from the microcontroller:
The script will parse this and use MQTT to inform openHAB about any state changes for mousetrap triggered, temperature and battery voltage (converted to approximate level in percent). Every seven hours a payload will be sent even if sensor wasn’t triggered. This is quite battery-optimized and also makes it possible to monitor if it’s operating correctly, temperature and remaining battery life.
Notifications
Rules implemented in openHAB makes sure I get notifications when:
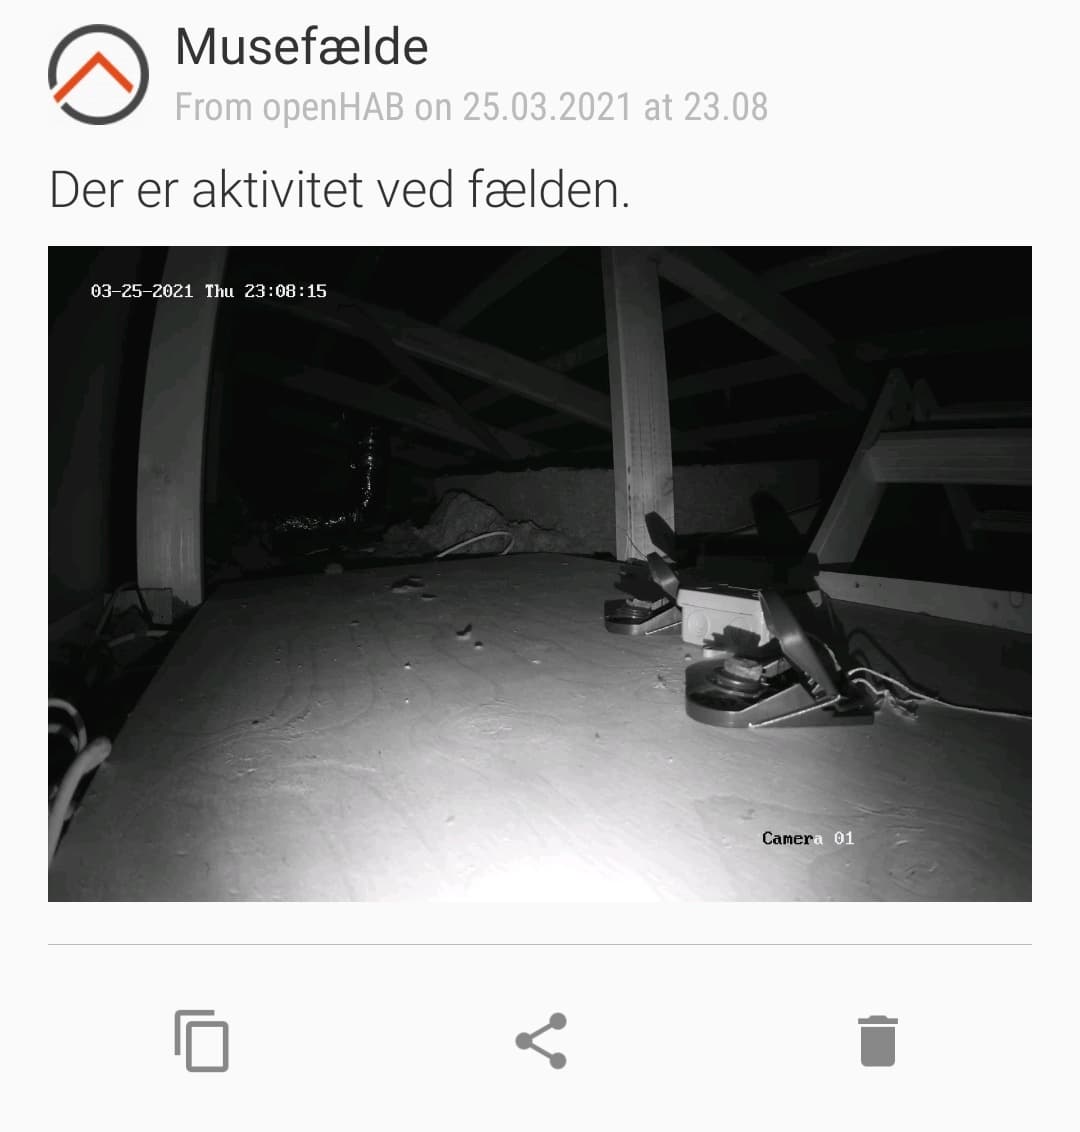
The mousetrap has been triggered (on cellphone and TV).
On cellphone a picture will be included (from a Hikvision surveillance camera).
It has been more than sevens hours since last payload was received.
When payload has been received again after previously missing.
When battery is low.
A notification could look like this:
Power consumption
The Raspberry Pi Zero WH with HAT uses ~0.6 W in this configuration. It’s connected through Wi-Fi, not Ethernet.
Statistics
I started using this setup in October 2020. Since then caught 3-4 mice and quickly reloaded traps at least as many times without a successful hit. The last part is important as this increases the chance of actually catching the small rodents when traps are always operational and loaded with bait.
Lauritz Knudsen by Schneider Electric just released a range of new ZigBee-based products for the Danish market, and today I got my hands on the LK Fuga Wiser Wireless Dimmer:
LK Fuga Wiser Wireless Dimmer as shown everywhere.
This dimmer is ZigBee-certified and should work with any ZigBee-gateway (like Philips Hue or IKEA Trådfri) as well as their own Wiser Gateway, which was also introduced in Denmark this week. And which, by the way, seems to be replaced soon by this Wiser Basic Hub.
My expectation is that this dimmer should identify itself as a dimmable light and work the same way as a Sunricher dimmer or any Philips Hue, IKEA Trådfri, Osram Smart+ or other dimmable ZigBee bulb. In other words, I would not expect any problems adding this dimmer to my Philips Hue bridge. So let’s see if my expectations will be fulfilled…
Experimental set-up
Pairing the device with Philips Hue bridge was painless. After three fast clicks on upper left button, it was found by the bridge as a dimmable bulb. Perfect. Now tried to control the connected LED bulb through the Philips Hue app and experienced some weird behavior: Light cannot be switched off! It can be switched on and dimmed up and down without much delay, but it can’t be switched off. When using the buttons on the dimmer to control the light, there is some delay until reflected in Philips Hue, but this is somewhat expected. Within a minute it will be there.
Compatibility/integration
Now decided to investigate this switching off issue a bit more, so added the dimmer to openHAB through the Hue API to monitor exact values with timestamps etc. and try to control it with specific values. It turns out that using openHAB I was able to switch it off by simply setting brightness to 0 like any dimmable light.
So without openHAB, I thought, will I be able to somehow switch it off from within Hue itself? I configured one of my Friends of Hue switches to control the dimmer, and without any problems was able to turn it on as well as off.
Last, I tried configuring a Philips Hue motion sensor for controlling the room where I added the dimmer. This doesn’t work either. Just before it’s about to switch it off, Hue dims a tiny bit as a warning. This part works, but it stays like that and doesn’t switch off.
So it seems that the problem is a very specific compatibility issue with the Philips Hue app and accessories – perhaps some slight difference in the way it turns off lights and dims to 0%. I have ruled out my bridge/configuration since the same problem has been reported by others. LK Dimmer FW version: 001.002.021.R.
Digging deeper
In openHAB the dimmer is represented by a single item, Brightness. However, this kind of item can be used as a dimmer/slider as well as a switch. So in a sitemap I tried to create both types to be able to compare the difference, since dimming to 0% actually works. Here is the result:
Switch it on:
2021-03-07 15:37:26.109 [INFO ] [openhab.event.ItemCommandEvent ] – Item ‘Wiser_Brightness’ received command ON 2021-03-07 15:37:26.129 [INFO ] [penhab.event.ItemStatePredictedEvent] – Item ‘Wiser_Brightness’ predicted to become ON 2021-03-07 15:37:26.136 [INFO ] [openhab.event.ItemStateChangedEvent ] – Item ‘Wiser_Brightness’ changed from 0.0 to 100
Swith it off – this didn’t work:
2021-03-07 15:37:35.408 [INFO ] [openhab.event.ItemCommandEvent ] – Item ‘Wiser_Brightness’ received command OFF 2021-03-07 15:37:35.427 [INFO ] [penhab.event.ItemStatePredictedEvent] – Item ‘Wiser_Brightness’ predicted to become OFF 2021-03-07 15:37:35.434 [INFO ] [openhab.event.ItemStateChangedEvent ] – Item ‘Wiser_Brightness’ changed from 100 to 0
Dim it to 0%, effectively switching it off (this worked):
2021-03-07 15:37:43.178 [INFO ] [openhab.event.ItemCommandEvent ] – Item ‘Wiser_Brightness’ received command 0.0 2021-03-07 15:37:43.194 [INFO ] [penhab.event.ItemStatePredictedEvent] – Item ‘Wiser_Brightness’ predicted to become 0.0 2021-03-07 15:37:43.217 [INFO ] [openhab.event.ItemStateChangedEvent ] – Item ‘Wiser_Brightness’ changed from 100 to 0.0
Did you notice the difference? When setting brightness to “0”, nothing happened. When setting it to “0.0” it works. This should give some indication of the type of bug/incompatibility. Until Lauritz Knudsen hopefully fixes this issue, this can be used as temporary work-around in openHAB:
rule "Wiser work-around"
when
    Item Wiser_Brightness changed to 0
then
    Wiser_Brightness.sendCommand("0.0")
end
This will detect all attempts to switch off the dimmer, also attempts made by accessories like a motion sensor.
Update, March 16th 2021: Although the description above might give some indication about the problem, it’s still only that – an indication. Today I decided to investigate a little deeper to be able to understand the problem without distraction from openHAB. So I created a Hue Developer account to access the Hue documentation and tested directly using the Hue API. Here’s my new finding – this doesn’t work:
URL: /api/<username>/lights/<id>/state
Method: PUT
Body: {"on":false}
But with this body, it works:
{"on":false, "transitiontime":0}
It seems to work with any transitiontime value. As documented:
The duration of the transition from the light’s current state to the new state. This is given as a multiple of 100ms and defaults to 4 (400ms). For example, setting transitiontime:10 will make the transition last 1 second.
To be very specific: It turns off almost immediately with 0, and in 400 ms with the value 4. This is supposed to be the default value, but without it, it doesn’t work. So the Hue app most likely doesn’t include transition time when using the on/off switch, and the same seems to be the case for openHAB. I believe I found the explanation in the binding source code:
           case CHANNEL_BRIGHTNESS:
                if (command instanceof PercentType) {
                    newState = LightStateConverter.toBrightnessLightState((PercentType) command);
                    newState.setTransitionTime(fadeTime);
                } else if (command instanceof OnOffType) {
                    newState = LightStateConverter.toOnOffLightState((OnOffType) command);
                } else if (command instanceof IncreaseDecreaseType) {
                    newState = convertBrightnessChangeToStateUpdate((IncreaseDecreaseType) command, group);
                    if (newState != null) {
                        newState.setTransitionTime(fadeTime);
                    }
                }
So when brightness is set from a switch (OnOffType), the transitionTime attribute is not set, thus it will not work.
With this knowledge work-arounds are possible, although no generic work-around that would fix all integrations. For example for a Hue motion sensor, transitiontime can be added through the Rules API (this has been tested and works):
Update, November 23rd 2021: I’ve created a workaround in the Hue binding in openHAB: https://github.com/openhab/openhab-addons/pull/11572 – it will be included in release 3.2, but a JAR file is also available, and it can be used with 3.1 installations. With this fix, everything works from openHAB, but of course each integration (including the Philips Hue app) will need to provide own workarounds until the LK Wiser bug is fixed.
Power consumption
No post without some mentioning of power consumption. Measured switched off over 24 hours with SparOmeter it used 0.009 kWh, so just below 0.4 W in average. This is exactly as specified in the manual with 0.4 W as max. power consumption. Sunricher dimmer box in comparison uses 0.015.kWh in 24 hours, i.e. roughly 0.6 W.
Dimming characteristics
This is probably a difficult topic with a lot of compatibility concerns, but it’s important to know how well this dimmer can actually dim. I don’t have the equipment or knowledge to measure this. I used an IKEA 1000 Lumen LED bulb for testing, and it went from ~15 W to 3.4 W when fully dimmed. In comparison, a Sunricher dimmer was able to dim below 1 W. The bulb used in my test can only be dimmed to ~2.6 W, after that it starts flickering and eventually it will turn off. However, to be able to dim this much, the minimum level should be configurable. This does not seem to be the case with this LK Dimmer, at least not by using the buttons (when not using their own Wiser gateway).
For the same bulb the LK Touch LED 180 IR will dim this bulb to 4.0 W, so here Wiser is a slight improvement.
Price
This dimmer is the most expensive dimmer I have ever seen. LK LED Touch is cheap in comparison, so is IHC Wireless in general. I really hope prices will drop sooner than later in order to sell more. I bought one after waiting for a product like this for years, but won’t be buying more until prices will drop. The same goes for the double relay switch. At the time of writing, the cheapest I have been able to find has a price tag of 899,- DKK.
Functionality
Unfortunately, and this is also the reason for the price tag, almost no competition exists. This is only because of the small Danish market for LK Fuga design. Currently, this is the best solution on the market for LK Fuga, if:
You don’t have anywhere to put a Sunricher (or similar) dimmer.
You want to be able to control your light through ZigBee and using a wall switch (without the wall switch taking your light offline).
You want to be able to control your light always, even when your gateway is down or wireless signal is disturbed.
You want to be able to control your light without any concern about batteries running low.
Until switching off bug is fixed: Replace “ZigBee” by “Wiser app”.
Conclusion
I have wanted this product for years. Now that it’s here, I wish it would work better with Philips Hue, and I wish I could use it everywhere in my house. Unfortunately I can’t/won’t because of the price tag. Summary:
Price: Too high.
Software: Too buggy (switching off doesn’t work).
Dimming: Can’t dim as much as some other dimmers on the market, and minimum level can’t be configured.
If LK would fix the problem of not being able to turn off the dimmer without supplying transition time, this would actually be a pretty decent product. Pricey, but decent, and I would instantly install this dimmer in my family room for controlling our PH5 lamps.
It’s been a while since my last post, so just a short one this time. I invested in VELUX ACTIVE with NETATMO in 2019 for controlling my skylights. I knew it was a cloud-based solution with all its cons, and even without any API for integration. This obviously sucks, but suddenly ClientID and ClientSecret was published in an openHAB Community thread, so I no longer had the excuse that I didn’t want to spend time reverse engineering the APK for Android. Now it was just a matter of implementing an integration.
Since I didn’t have experience with Python yet, I decided I wanted to try to use that for an implementation. It was my impression that it had everything I needed: HTTPS, JSON and MQTT. And I was right, so after 90 minutes of google-coding, this is my implementation for fetching my data from my sensor switch (CO2, temperature and humidity). Implementation is based on https://github.com/nougad/velux-cli.
First script is run to get a token which will be used for authentication. Script will ask for the password for the corresponding Velux account:
A file ‘token.json’ will be saved in current directory. Next script will refresh the token, so this must be run once per every few hours. I don’t remember exact expiration period, but it’s in the response.
This post is not a hardware post, but just a simple way to use a smart plug to replace a conventional smart power strip to avoid unneeded standby power consumption. For my home entertainment system I previously used a conventional smart power strip, but it caused several crashes of my media center, a Raspberry Pi running Kodi. So I decided to replace it with a standard power strip connected to a smart plug, and let openHAB do the magic.
I decided to use a ZigBee smart plug due to low power consumption and since already having a Philips Hue bridge within range. I went with an Innr smart plug, since the Philips Hue smart plug hadn’t been introduced at the time.
As trigger for turning power on or off, I went with my Harmony Hub. This way I can also turn off the network switch, since the Hub is Wi-Fi connected. When any activity is started, requiring any of the powered off devices, I’ll simply turn on the smart plug. When powering off, I need Kodi to shutdown and wait for this. So here are the rules I ended up with:
rule "TV turn on socket"
when
    // This is logically correct, but too slow because it's only fired when
    // activity has completed. It's a fallback solution because of a bug in
    // the binding, see below.
    Item HarmonyHub_CurrentActivity changed from "PowerOff" or
    // These channel triggers are fast, but logic is messy because logic
    // cannot be reversed. The correct solution would be to trigger on an item
    // bound to "Activity Starting Trigger" and use same logic as above:
    // Item HarmonyHub_ActivityStartingTrigger changed from "PowerOff"
    Channel "harmonyhub:hub:HarmonyHub:activityStarting" triggered Watch_tv or
    Channel "harmonyhub:hub:HarmonyHub:activityStarting" triggered Listen_to_music or
    Channel "harmonyhub:hub:HarmonyHub:activityStarting" triggered Watch_a_movie or
    Channel "harmonyhub:hub:HarmonyHub:activityStarting" triggered Kodi or
    Channel "harmonyhub:hub:HarmonyHub:activityStarting" triggered Chromecast
then
    Tv_Socket_Switch.sendCommand(ON)
end

rule "TV turn off socket"
when
    Item HarmonyHub_CurrentActivity changed to "PowerOff"
then
    var num_of_attempts = 20
    var delay_between_attempts = 5000
    var attempt = 0

    var kodi_initial_online_state = NetworkDeviceKodi_Online.state

    // Waiting for Kodi (might be booting up)
    while (NetworkDeviceKodi_Online.state == OFF && attempt < num_of_attempts)
    {
        attempt = attempt + 1
        Thread::sleep(delay_between_attempts)
    }

    if (NetworkDeviceKodi_Online.state == OFF)
    {
        sendPushMessage.apply("Tv turned off", "Kodi is offline. Something wrong?")
    }
    else if (kodi_initial_online_state == OFF)
    {
        // Initial state offline, now online - waiting for services to start"
        Thread::sleep(30000)
    }

    if (HarmonyHub_CurrentActivity.state == "PowerOff")
    {
        // Attempting to shut down Kodi
        sendHttpPostRequest('http://pi3:80/jsonrpc', 'application/json', '{"jsonrpc":"2.0","method":"System.Shutdown","id":1}')
        Thread::sleep(30000)

        // Waited 30 seconds, checking if activity didn't start again
        if (HarmonyHub_CurrentActivity.state == "PowerOff")
        {
            Tv_Socket_Switch.sendCommand(OFF)
        }
        else
        {
            sendPushMessage.apply("Tv turned off", "Tv turned on again after Kodi was shut down - now offline. Trying to restart.")
            Tv_Socket_Switch.sendCommand(OFF)
            Thread::sleep(5000)
            Tv_Socket_Switch.sendCommand(ON)
        }
    }
    else
    {
        // Shutdown/power off aborted, new activity started.
    }
end
I might look over-complicated, but I wanted a defensive approach to make sure everything is done to not trigger data corruption when power is taken from the Kodi Pi without proper shutdown. For example, if the Pi is still booting when TV is turned off, it won’t be able to accept a shutdown command yet, so I’m waiting for it to complete booting. Also, in case the TV is turned on again while the Pi is shutting down, I try to boot it again by turning it off and on again.
Inspired by my own LockU2 utility and Useless Box, I came up with a simple and stupid, yet effective, openHAB rule to prevent my kids from watching YouTube when they are not allowed to do so. So first requirement was ability to turn this lock on or off – just added a new switch item for this, and added it to a sitemap.
The rule makes use of the LGTV binding as well as HarmonyHub binding. Without any of these, I don’t think it would be possible to pull off.
Here goes:
rule "Lock YouTube"
when
    Item LGTV_Application changed to "youtube.leanback.v4" or
    Item LGTV_Application changed to "youtube.leanback.kids.v4"
then
    if (Lock_YouTube.state == ON)
    {
        //HarmonyLGTV_ButtonPress.sendCommand("Exit")
        LGTV_Application.sendCommand("com.webos.app.livetv")
    }
end

rule "Enable Lock YouTube"
when
    Item Lock_YouTube changed to ON
then
    if (HarmonyHub_CurrentActivity.state == "Watch TV" &&
        (LGTV_Application.state == "youtube.leanback.v4" || LGTV_Application.state == "youtube.leanback.kids.v4"))
    {
        //HarmonyLGTV_ButtonPress.sendCommand("Exit")
        LGTV_Application.sendCommand("com.webos.app.livetv")
    }
end
This YouTube blocker won’t actually block the YouTube app on the television, but will instead immediately quit the app once it’s launched. If YouType (or YouTube Kids) is already running when activating the lock, it will also quit the app. Update: Changed to use LGTV binding for quitting YouTube – old method commented out.
I almost couldn’t wait for the premiere which was last Saturday morning. I also have a rule in place for generating notifications when the lock has been triggered. After explicitly instructing my son that YouTube was not allowed that morning, only five minutes later I received the first notification that an attempt was made. After that four more identical notifications. Then a final notification that YouTube Kids had also been attempted. Success.
In summer 2019 we had heat recovery ventilation installed in our house: A Danfoss Air A2 unit with a CCM module connected to our existing Danfoss Link CC Controller. The integration here is pretty useless: The Danfoss Link app can’t do anything other than read outdoor temperature and set vacation mode. Even the Link CC is crippled, compared to the Air Dial – for example it’s not possible to read relative humidity, thus completely impossible to check if the system is running as it should.
A few days after installation I added a WeMo Insight integrated with openHAB, so at least I have logged power consumption data since then. Then in November I finally couldn’t resist installing a network cable to the CCM unit as I saw it having an Ethernet port.
I was able to run the Danfoss HRV PC-Tool and finally read some more data like relative humidity. Naturally, next thing on my mind was reverse engineering of the protocol used. I didn’t have to do much research until I found this openHAB Community thread. Reading through the thread ended with the good news that someone already did all the work and even created an openHAB binding.
Fun
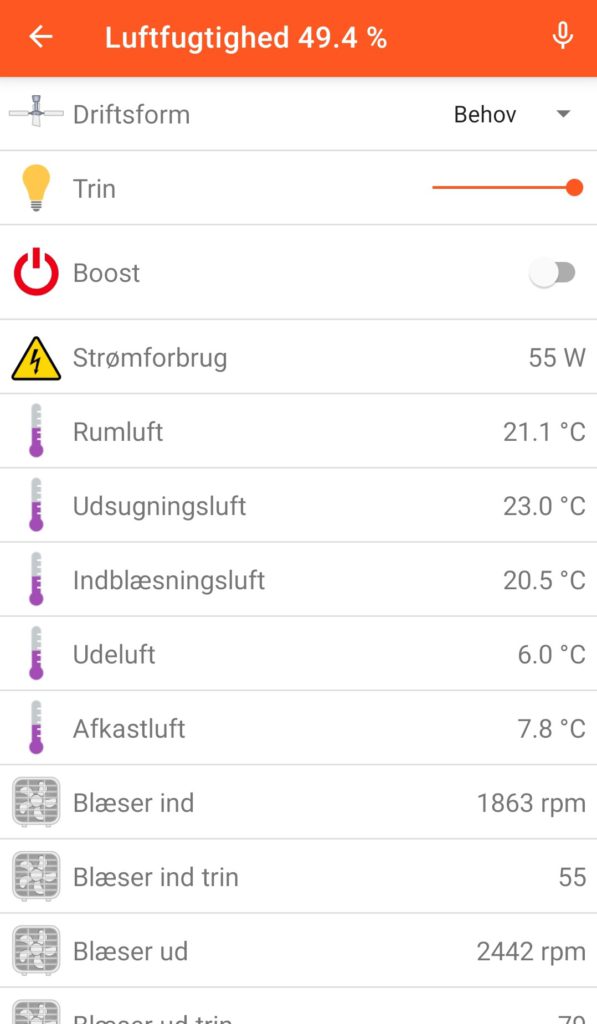
Installing the alpha version of the binding couldn’t be any easier and it worked out of the box without any problems. I linked almost all channels and started seeing and logging useful information like operating mode, fan speeds, boost, humidity, temperatures and remaining filter life.
Next, I could start adding rules to actively monitor how the system was operating. I started getting notifications on my phone when boost was activated to get a feeling about when that usually happens. I could also start making humidity graphs, which got me suspicious about these measurements. Comparing with my Netatmo data from four different indoor stations in the house, the Air unit’s measurements are consistently 5-10 % higher. This of course impacts how the system operates, as humidity is likely the only parameter used for calculating fan speed in “demand” mode.
Energy savings
Next revelation came when I found that some of the channels were writable, like operating mode, manual fan speed and boost. Now this turned into something really useful!
The one thing even the Danfoss Link app can do is set vacation mode when away from the house. This will set the HPV to manual fan speed level 1 which consumes about 9 W. So I figured that this could be automated and also used on weekdays some time after everyone has left the house. I used existing presence logic for that (from Unifi access point), but also decided to add CO2 level as parameter for safety. During the night our phones will also go to sleep at some point, so some additional logic is needed.
Trying to perform humidity/demand calculations like the unit itself does would be cool, but also somewhat more complicated than what I had in mind to begin with. Also, it would require me to integrate some new humidity sensors as I don’t want to rely on Netatmo for this, since data is only refreshed every 10 minutes and also Internet-dependent and Netatmo service-dependent. In other words, untrustworthy. But as safety mechanism for presence-flaws and not needing fast reaction, CO2 measurements could be used.
Nest smoke alarm
I also have a couple of Nest smoke alarms which are integrated in openHAB as I haven’t migrated to Google. So why not use them and trigger boost if smoke is detected?
Rules
So here we go. First, I have a rule that will trigger an Android notification when boost is activated. This includes relative humidity from the Air unit as well as from four different rooms in the house, and includes previous values 20 minutes ago. The rule is too ugly to post, and probably too specific to share anyway, so let’s skip it and go directly to the power-saving rule:
rule "Danfoss control"
when
    Item Anyone_Home changed to ON or
    Item SkynetStationIndoor_Max_CO2 changed or
    Item HomeLeft30MinutesAgo received command OFF
then
    var hasChanged = Anyone_Home.changedSince(now.minusMinutes(29))
    if (Anyone_Home.state == OFF
        && !hasChanged
        && (SkynetStationIndoor_Max_CO2.state as Number).intValue < 500
        && DanfossHRV_Main_Mode.state == "DEMAND")
    {
        DanfossHRV_Main_Mode.sendCommand("MANUAL")
        DanfossHRV_Main_ManualFanSpeed.sendCommand(10)
    }
    else if ((Anyone_Home.state == ON || (SkynetStationIndoor_Max_CO2.state as Number).intValue >= 700)
        && DanfossHRV_Main_Mode.state != "DEMAND")
    {
        DanfossHRV_Main_Mode.sendCommand("DEMAND")
    }
end
SkynetStationIndoor_Max_CO2 is a group with function “MAX” being linked from my four different Netatmo CO2 items. HomeLeft30Minutes ago is a manually created item based on the Expire Binding:
rule "Anyone home timer start"
when
    Item Anyone_Home changed to OFF
then
    HomeLeft30MinutesAgo.postUpdate(OFF)
    HomeLeft30MinutesAgo.sendCommand(ON)
end

rule "Anyone home timer cancel"
when
    Item Anyone_Home changed to ON
then
    HomeLeft30MinutesAgo.postUpdate(OFF)
end
So this first rule will, in a pretty simple way, just switch to lowest step 30 minutes after everyone left the home and CO2 levels are all below 500. This is a conservative way to take control only when assuming no humidity will be generated. Weakest point is that humidity is not considered at all, so for example when drying clothes indoor, rule might trigger anyway.
Next, the smoke alarm rule (still untested):
rule "Danfoss boost on smoke alarm with oven running"
when
    Item NestProtectFamilyRoom_SmokeAlarmState changed from "OK" or
    Item NestProtectHall_SmokeAlarmState changed from "OK"
then
    if (Oven_Status.state != "Off")
    {
        DanfossHRV_Main_Boost.sendCommand(ON)
    }
end
And last, the filter notification:
rule "Danfoss filter monitoring"
when
    Item DanfossHRV_Service_RemainingFilterLife changed
then
    if (DanfossHRV_Service_RemainingFilterLife.state < 10)
    {
        var body = String::format("Remaining filter life: %d %%", (DanfossHRV_Service_RemainingFilterLife.state as Number).intValue)
        // Use some service to push notification, I use Pushbullet.
    }
end
Of course also added a sitemap section to have some app control, since Danfoss doesn’t provide this (in Danish, but you probably get the idea):
Thanks to pravussum for the binding, which can be found here:
After upgrading UniFi Controller to version 5.12.35 last week, the openHAB binding started having problems with the Online channel. Going from OFF to ON is still detected correctly, but not the other way around. I’m still not sure if this is a problem in the binding, the controller or in my configuration. Only thing I know for sure is that after upgrading the controller image in Docker and the access point firmware at the same time, binding stopped detected our phones disconnecting from the access point.
openHAB is version 2.5.1. I have asked in the openHAB forums, but is still waiting for feedback.
In the meantime I’ve created a work-around using rules. Problem is that once client goes offline, it seems to be excluded from the list fetched by the binding, and channel stops receiving updates. For LastSeen it makes sense, but Online should be updated to OFF, when client is no longer listed. So I used LastSeen to mimic this desired logic in my rule:
var Timer timerUniFiJacob = null

rule "UniFi work-around Jacob"
when
    Item UniFi_OnePlus5_LastSeen changed
then
    if (Jacob_Home.state == OFF)
    {
        Jacob_Home.sendCommand(ON)
    }

    if (timerUniFiJacob === null)
    {
        timerUniFiJacob = createTimer(now.plusSeconds(180), [ |
            Jacob_Home.sendCommand(OFF)
        ])
    }
    else
    {
        timerUniFiJacob.reschedule(now.plusSeconds(180))
    }
end
This rule simply restarts a 3 minute timer on each LastSeen update. When client goes offline, these updates will stop and after three minutes, item Jacob_Home will be set to OFF.